I’m a huge fan of running common open source packages in Docker containers. It greatly simplifies deployment, re-deployment, maintenance and backup of software that can be very complicated otherwise. In my lab, I have ended up with enough containers that one Docker host can’t house them all. My solution was to create a multi-node Docker Swarm cluster. Like many clustered solutions, this poses the question of “how am I going to load balance this”. Here is my NetScaler/ADC based approach to that.
First a few disclaimers:
- There are a number of ways to run containers in a cluster. Kubernetes is by far the most popular. I chose Docker Swarm over Kubernetes because it is much simpler to deploy and has lower overhead. This guide shows specifics on how to load balance Docker Swarm. But the concepts can be used to load balance any container based cluster.
- Citrix NetScaler is available in many form factors. One of those, CPX, is designed specifically for use within container platforms. In my experience, for small environments like my lab a VPX or MPX is a more common solution. They will often be multipurpose devices with roles outside of container load balancing. CPX is a fantastic answer when integrated into large scale containerized applications designed for scalability and automation. This example will use a VPX appliance, but the concepts can be used in a CPX deployment as well.
- A key concept with containerized applications is automation or Infrastructure-as-code. Everything I show here can be automated so that as containers scale up and down or new containers are created the NetScaler is configured accordingly. This can be done with deployment scripts or an automation platform like Puppet or Terraform.
- Yes. I know it’s now Citrix ADC, not NetScaler. You can’t make me stop calling it NetScaler!
OK, with that out of the way, lets take a look at how to load balance Docker Swarm with a NetScaler VPX appliance.
Overview
In my environment I have a three node Docker Swarm cluster. The cluster uses NFS storage for the containers to store and share persistent data. Most of my containers are single instance, however the configuration I show here can be used to load balance multi-instance containers as well.
Docker Swarm Networking
Docker Swarm provides a number of networking options to allow containers and hosts to communicate. This can be a pretty complex topic, but there’s one very important option that is used by default in a Swarm: Mesh Routing.
To allow inbound communication, each Docker container can publish network ports. The Docker host running the container will listen on these ports and pass traffic on them to the matching container.
Mesh Routing allows each Swarm worker node to listen on any network ports published by container in the Swarm. Because of this, a node can receive traffic on a port when it doesn’t have a local instance of a container using that port. In that case, the node will proxy the traffic to another node that is running an instance of the container. This is great for simple deployments because it means that a connection will always succeed, regardless of where a container is running.
However, if we want to use a load balancer in front of our Swarm, Mesh Networking causes a problem. Since every worker node will respond to every port, there’s no way for a load balancer to determine which nodes are running an instance of each container. Without that determination, traffic may be load balanced to a node that does not run the container. Since the node will proxy the traffic it will still function, but it causes an unnecessary double hop.
The solution is to publish ports for Swarm services with the Host Mode option. This will bypass Mesh Routing and only present the published ports from nodes actually running the container. Here is an example of launching a container (with many ports) with that option:
docker service create \
  --name=unifi-controller \
  --replicas 1\
  -e PUID=1000 \
  -e PGID=1000 \
  -e MEM_LIMIT=1024M `#optional` \
  --publish target=3478,published=3478,protocol=udp,mode=host \
  --publish target=10001,published=10001,protocol=udp,mode=host \
  --publish target=8080,published=8080,mode=host \
  --publish target=8081,published=8081,mode=host \
  --publish target=8443,published=8443,mode=host \
  --publish target=8843,published=8843,mode=host \
  --publish target=8880,published=8880,mode=host \
  --publish target=6789,published=6789,mode=host \
  --mount type=bind,source=/mnt/DockerData/containerdata/unifi-controller,target=/config \
  linuxserver/unifi-controller
With this configuration, ports will only be published from a worker node if it is actually running an instance of the container. This will allow us to use monitors on the NetScaler to route traffic properly and avoid extra hops.
NetScaler Configuration
From this point, it’s a pretty standard load balancing setup on the NetScaler. First, navigate to Traffic Management > Load Balancing > Servers and create a new server entry for each Docker Swarm Worker Node:

Next, navigate to Traffic Management > Load Balancing > Service Groups and create a new service group for the application in the container. Note that since this container is running many ports, I used the Any protocol. When prompted add your Worker Node Servers as the Service Group Members.
Add a monitor to your Service Group. If your Service Group is configured for a single port you can use a simple TCP monitor, or something more appropriate for the application running in the container. In my case, since I’m using Service Group with an Any protocol, I defined a TCP monitor for the main port the application uses:
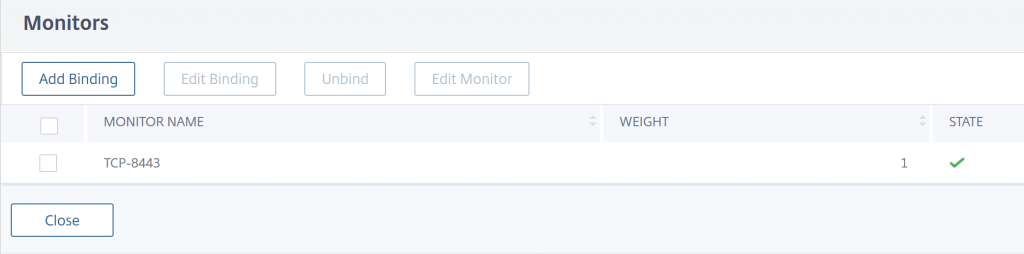
Once the monitor is attached to the Service Group, open the Service Group Members list. You should now see that only the Worker Nodes that are currently hosting an instance of the container show as up.
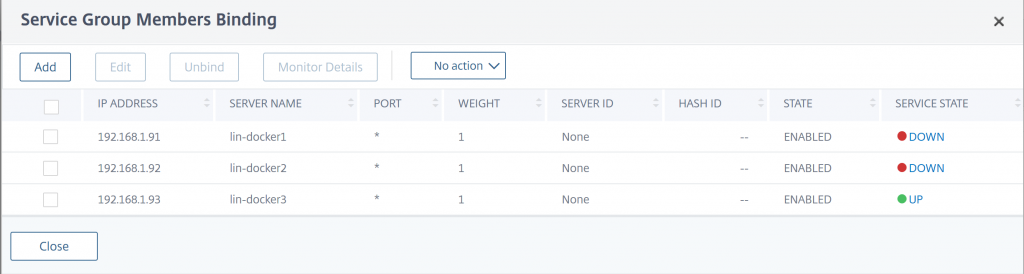
In the Service Group list, you should also see that your Service Group shows as Partial-Up. Unless you have an instance of your container on all Worker Nodes, then the Service group should show as Up.

Now you can configure your Load Balancer vServer normally, using the Service Group as the back end binding. The NetScaler will route traffic only to the nodes with a functioning instance of the container.
This is a great article, thanks! Can I assume this would work equally well with normal non-mesh bridge networking instead of host?
Are you running multiple CPXs across the swarm to cope with failure of anyone CPX (if you have a similar article for that, that would be cool.
I am thinking of using this to front a pi-hole swarm… any thoughts on the stupidity of that you would like to share 🙂
Thanks! It should work with any kind of container networking. The NetScaler will look for a node to be responsive on the port to determine that it’s ok to send traffic there. My main goal with Host was to get rid of any unnecessary double hops.
I’m actually running this on a VPX external to the Swarm. Main reason for that is that it already existed. It’s doing other work, so it wouldn’t fit in a container. In theory, this would work on a (or multiple) CPX running in the Swarm. However, unless you have a CPX deployed to every node, you have the same potential for a double hop.
From a network standpoint, the Pi-Hole Swarm should work. But I’m not sure Pi-Hole can be clustered, so your config and metrics would be all screwey if you had more than one instance of it in the Swarm.