UPDATE: Citrix and Duo have made some changes that simplify this configuration. I discuss a new variation of this configuration in this post.
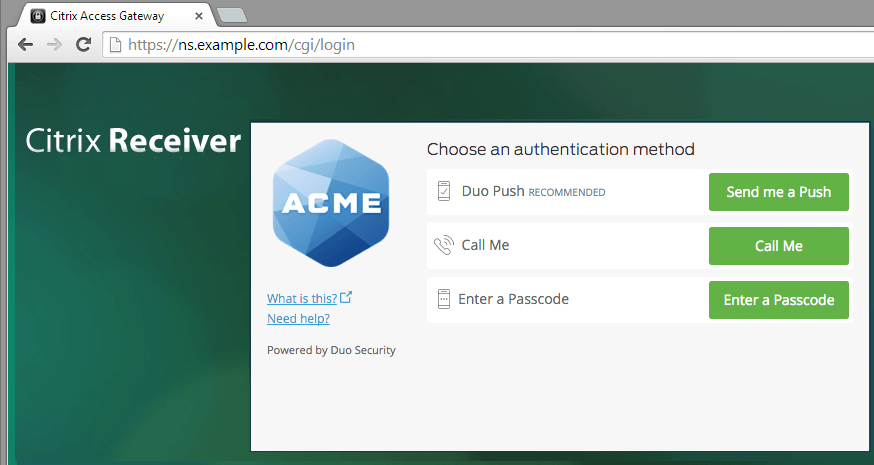
Duo has become prevalent enough that I check it’s compatibility any time I’m looking at a new remote access system. Duo actually publishes a solid how-to on integrating with NetScaler, specifically Gateway. Unfortunately, this method relies on the old NetScaler Basic Authentication Policy framework and uses some secret sauce internal to both NetScaler and Duo. There are also a couple drawbacks to doing it this way:
- Basic Authentication Policies are now a deprecated feature.
- Basic Policies are applied to everyone accessing a vServer, there’s no granular control – just on and off.
- The RFWebUI does not work with this integration.
- nFactor is way more fun.
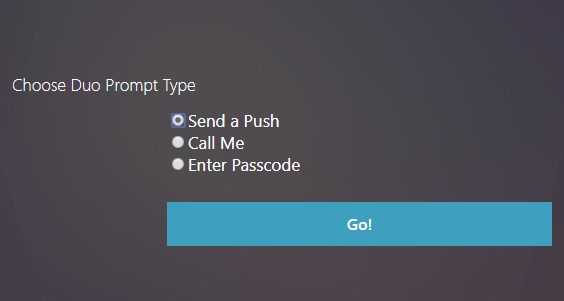
I’ve been trying for a while to get Duo working with nFactor to overcome these limitations. It’s fairly straightforward to use the Duo Authentication Proxy as a plain RADIUS server and get basic functionality working. But there’s a problem with that. When properly integrated, Duo provides users the ability to select which prompt method they will use by displaying this screen:
When using “plain RADIUS” with nFactor, the system just chooses the user’s default prompt method (usually Push) without asking the user. This works in most cases, but doesn’t provide any fail back method. These are needed if a user loses their device, re-installs the Duo app, etc…
I’ve been looking at this for little while, and talking with Jacob at serioustek.net about it. He had an idea that made the whole thing work. He wrote an excellent post outlining the key steps to setting it up. And with a little nFactor magic, we can do this:
I wanted to take this a a bit further though. One of the strengths of nFactor is the ability to create different authentication requirements based on a user’s group membership, source ip, client type…anything you can think of a policy for. This lets us have a single vServer (Web, Gateway, etc…) that’s still able to accommodate a variety of authentication methods. I’ve also noticed that there aren’t any end-to-end examples of configuring this type of setup. I’m going to attempt that here.
Overview
I’m going to demonstrate how to setup the following authentication workflow and assign it to a Unified Gateway vServer:
- All users are prompted for Active Directory credentials.
- Members of a specific AD group will be prompted to select a Duo prompt method, then Duo authenticated.
- If the client program is Receiver or the NetScaler VPN client, the prompt will not be shown and push will be used instead. This is because Receiver and the NetScaler VPN client do not support displaying nFactor login screens (yet…).
- Non-group members will be logged in with only AD credentials.
This configuration will be done in the web GUI instead of the command line. Also, in this example we’re building things from the bottom up. Actions > Policies > Policy Label > etc… This minimizes the amount of moving back and forth between modules. But, it can make it hard to understand why we’re doing certain steps. I recommend reading the entire process to see how it fits together before doing it.
Prerequisites
I’m assuming you are starting with the following in place:
- Existing NetScaler ADC with Enterprise or Platinum licensing
- Working Unified Gateway vServer
- Functional Active Directory
- Fully configured Duo account with existing users
- Duo Authentication Proxy installed with default configuration
Planning
Before starting, it will save some time if you get the following items ready:
- Active Directory account to use as a LDAP bind account. You will need the Distinguished Name (DN).
- Create (or pick and existing) Active Directory group that will contain the 2 factor auth enabled users.
- Retrieve your ikey, skey and API host from your Duo account.
- Choose a RADIUS secret password.
Duo Authentication Proxy Configuration
First, we’ll configure the Duo Authentication Proxy. This is going to act as a RADIUS server for the NetScaler. In this configuration, we’ll configure three different RADIUS servers (ports) on the proxy. When called, each will produce a different Duo prompt for the user (push, call or passcode).
Note that in this example, we’re using a single Auth Proxy server. For a production configuration you should consider creating two (or more) and load balancing them with a LB vServer and appropriate monitors.
On the server where you installed the proxy, edit the Duo Auth Proxy configuration file (authproxy.cfg) and enter (replace everything in <> brackets with the values for your environment):
[duo_only_client]
[radius_server_auto1]
ikey=<your Duo ikey>

skey=<your Duo skey>

api_host=<your Duo api host>
failmode=safe
radius_ip_1=<NetScaler NSIP>
radius_secret_1=<RADIUS secret password>
client=duo_only_client
factors=push
port=18121
[radius_server_auto2]
ikey=<your Duo ikey>

skey=<your Duo skey>

api_host=<your Duo api host>
failmode=safe
radius_ip_1=<NetScaler NSIP>
radius_secret_1=<RADIUS secret password>
client=duo_only_client
factors=phone
port=18122
[radius_server_auto3]
ikey=<your Duo ikey>

skey=<your Duo skey>

api_host=<your Duo api host>
failmode=safe
radius_ip_1=<NetScaler NSIP>
radius_secret_1=<RADIUS secret password>
client=duo_only_client
factors=passcode
port=18123
Now restart the Duo Authentication Proxy Windows service and make sure it starts back up. If it refuses to restart, there is a mistake in your config file. The authproxy.log file will have clues where to look.
Authentication Actions
Next, we’ll create the actions for our authentication sources.
First, a LDAP action for Active Directory. Note that in this example, we’re pointing directly at a Domain Controller. For a production configuration, we should be creating a load balanced LDAP vServer with LDAPS and pointing at that. Navigate to Security > AAA- Application Traffic > Policies > Authentication > Advanced Policies > Action > LDAP. Click add to create a new LDAP action and fill in the following:
- Name: DomainName-LDAP-Action
- Server Name / Server IP: Server IP (Name can be used if you prefer)
- IP Address: Address of a Domain Controller
- Server Type: AD
- Base DN: DN for LDAP search root (dc=domain,dc=com)
- Administrator Bind DN: DN for your LDAP bind account
- Administrator Password: Password for your LDAP bind account
- Server Logon Name Attribute: sAMAccountName
- Group Attribute: memberOf
- Sub Attribute Name: cn
Next, three RADIUS actions. One for each Duo prompt type. Navigate to Security > AAA- Application Traffic > Policies > Authentication > Advanced Policies > Action > RADIUS. Click add to create a new RADIUS action and fill in the following:
- Name: Duo-RADIUS-Push-Action
- Server Name / Server IP: Server IP (Name can be used if you prefer)
- IP Address: Address of server hosting Duo Authentication Proxy
- Port: 18121
- Secret Key: your chosen RADIUS secret password
- Under More
- Password Encoding: mschapv2 (do not forget this)
Repeat to create two more RADIUS actions with the names and ports changed:
- Name: Duo-RADIUS-Phone-Action, Port: 18122
- Name: Duo-RADIUS-Passcode-Action, Port: 18123
Authentication Policies
Now, we’ll build the authentication policies that will be bound to the Policy Labels. Navigate to Security > AAA- Application Traffic > Policies > Authentication > Advanced Policies > Policy.
First we’ll create the LDAP authentication policy. Click Add and create the following policy:
- Name: LDAP-DomainName
- Action Type: LDAP
- Action: DomainName-LDAP-Action
- Expression: true
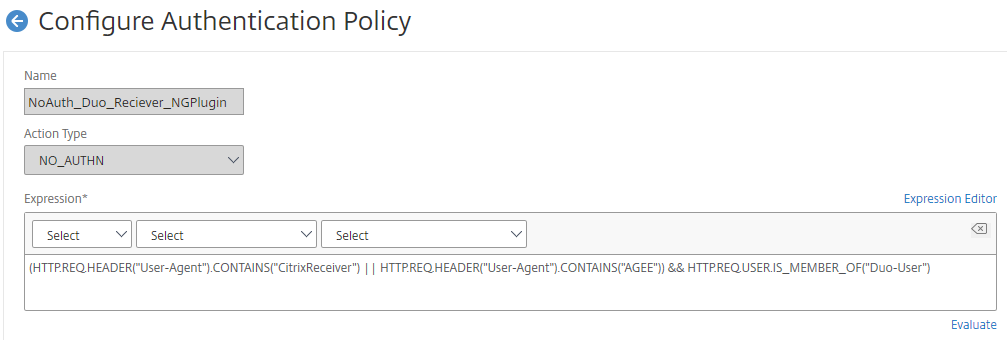
Next we’ll create the policy that will detect Reciever and the NetScaler VPN client:
- Name: NoAuth_Duo_Reciever_NGPlugin
- Action Type: NO_AUTHN
- Expression: (HTTP.REQ.HEADER(“User-Agent”).CONTAINS(“CitrixReceiver”) || HTTP.REQ.HEADER(“User-Agent”).CONTAINS(“AGEE”)) && HTTP.REQ.USER.IS_MEMBER_OF(“Your2FactorADGroup”)
Now, we need a policy to only check for membership to our 2 factor group:
- Name: NoAuth_Duo
- Action Type: NO_AUTHN
- Expression: HTTP.REQ.USER.IS_MEMBER_OF(“Your2FactorADGroup”)
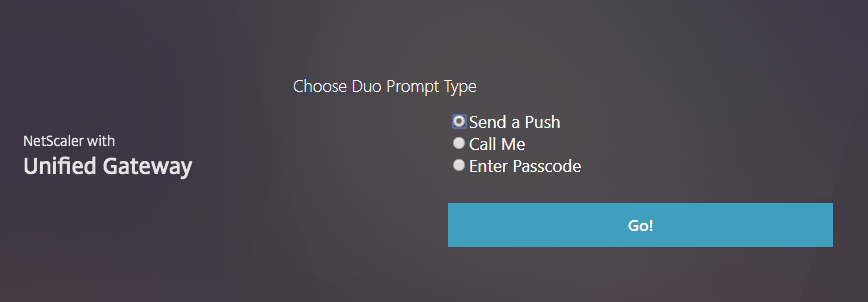
Next, we need a policy for our three Duo methods. The html string these policies look for will be defined in our Login Schema in a few steps. This is the variable that’s set when the user selects a login method radio button.
- Push Policy
- Name: Radius-Duo-Push
- Type: RADIUS
- Action: Duo-RADIUS-Push-Action
- Expression: HTTP.REQ.BODY(500).AFTER_STR(“duoauth=”).CONTAINS(“push”)
- Phone Policy
- Name: Radius-Duo-Phone
- Type: RADIUS
- Action: Duo-RADIUS-Phone-Action
- Expression: HTTP.REQ.BODY(500).AFTER_STR(“duoauth=”).CONTAINS(“call”)
- Passcode Policy
- Name: Radius-Duo-Passcode
- Type: RADIUS
- Action: Duo-RADIUS-Passcode-Action
- Expression: HTTP.REQ.BODY(500).AFTER_STR(“duoauth=”).CONTAINS(“pass”)
We also need a second version of the Push policy that only checks for group membership. This will be used when a Receiver or NetScaler VPN client connects to prompt the user without asking first. If you would rather the “default” action be a call, you can link to that action as well. Passcode cannot be used here since it requires user input.
- Name: Radius-Duo
- Type: RADIUS
- Action: Duo-RADIUS-Push-Action
- Expression: HTTP.REQ.USER.IS_MEMBER_OF(“Your2FactorADGroup”)
Last, create a policy that allows login with no auth. This policy will be used at the end of our policy chains:
- Name: NoAuth
- Action Type: NO_AUTHN
- Expression: true
Login Schema Profiles
Now we’ll build the Login Schema Profiles that will define the appearance of each login screen. Navigate to Security > AAA – Application Traffic > Login Schema > Profiles tab
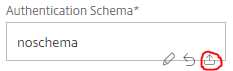
First up, we need a blank screen for login steps where we don’t want anything shown to the user. Technically there’s a built in Profile for this called LSCHEMA_INT, but I like to create one with a friendly name so it’s obvious what it’s doing. Click Add and create this Profile:
- Name: NoPrompt
- Authentication Schema: noschema
Next, we need a Profile with a User Name and Password field. Fortunately, there’s a built schema for this. Create a new policy:
- Name: UsernamePassword
- Authentication Schema:
- Click the Pencil icon:

- Click on the LoginSchema folder in the browser
- Select SingleAuth.xml
- Click the blue Select button
- Click Create
- Click the Pencil icon:
Last we need a custom Profile to display the Duo prompt method radio buttons. First, create a xml file on your local machine called Duo-Selector-Radio.xml. Paste in the following code:
<?xml version="1.0" encoding="UTF-8"?>
<AuthenticateResponse xmlns="http://citrix.com/authentication/response/1">
<Status>success</Status>
<Result>more-info</Result>
<StateContext></StateContext>
<AuthenticationRequirements>
<PostBack>/nf/auth/doAuthentication.do</PostBack>
<CancelPostBack>/nf/auth/doLogoff.do</CancelPostBack>
<CancelButtonText>Cancel</CancelButtonText>
<Requirements>
<Requirement><Credential><ID>title</ID><Type>none</Type></Credential><Label><Text>Choose Duo Prompt Type</Text><Type>plain</Type></Label></Requirement>
<Requirement><Credential><ID>duoauth</ID><Type>none</Type></Credential><Label><Type>none</Type></Label><Input><RadioButton><InitialSelection>push</InitialSelection><DisplayValues><DisplayValue><Display>Send a Push</Display><Value>push</Value></DisplayValue><DisplayValue><Display>Call Me</Display><Value>call</Value></DisplayValue><DisplayValue><Display>Enter Passcode</Display><Value>pass</Value></DisplayValue></DisplayValues></RadioButton></Input></Requirement>
<Requirement><Credential><ID>loginBtn</ID><Type>none</Type></Credential><Label><Type>none</Type></Label><Input><Button>Go!</Button></Input></Requirement>
</Requirements>
</AuthenticationRequirements>
</AuthenticateResponse>
Next, create a new Profile:
- Name: Duo-Selector-Radio
- Authentication Schema:
- Click the upload icon:
- Select the Duo-Selector-Radio.xml file on your machine
- Click Create
- Click the upload icon:
Policy Labels
Now we’ll build the Policy Labels for our authentication “chain.” Our auth logic looks like this:
- LDAP Auth
- Check for AD group membership and client type
- Ask user for Duo prompt type (if AD group member and not using Receiver or NetScaler VPN)
- Prompt user with Duo using selected method – or push if client is Receiver or NetScaler VPN
Since LDAP is the first authentication step, it will be defined directly in the AAA vServer and won’t need a Policy Label. We can skip that for now.
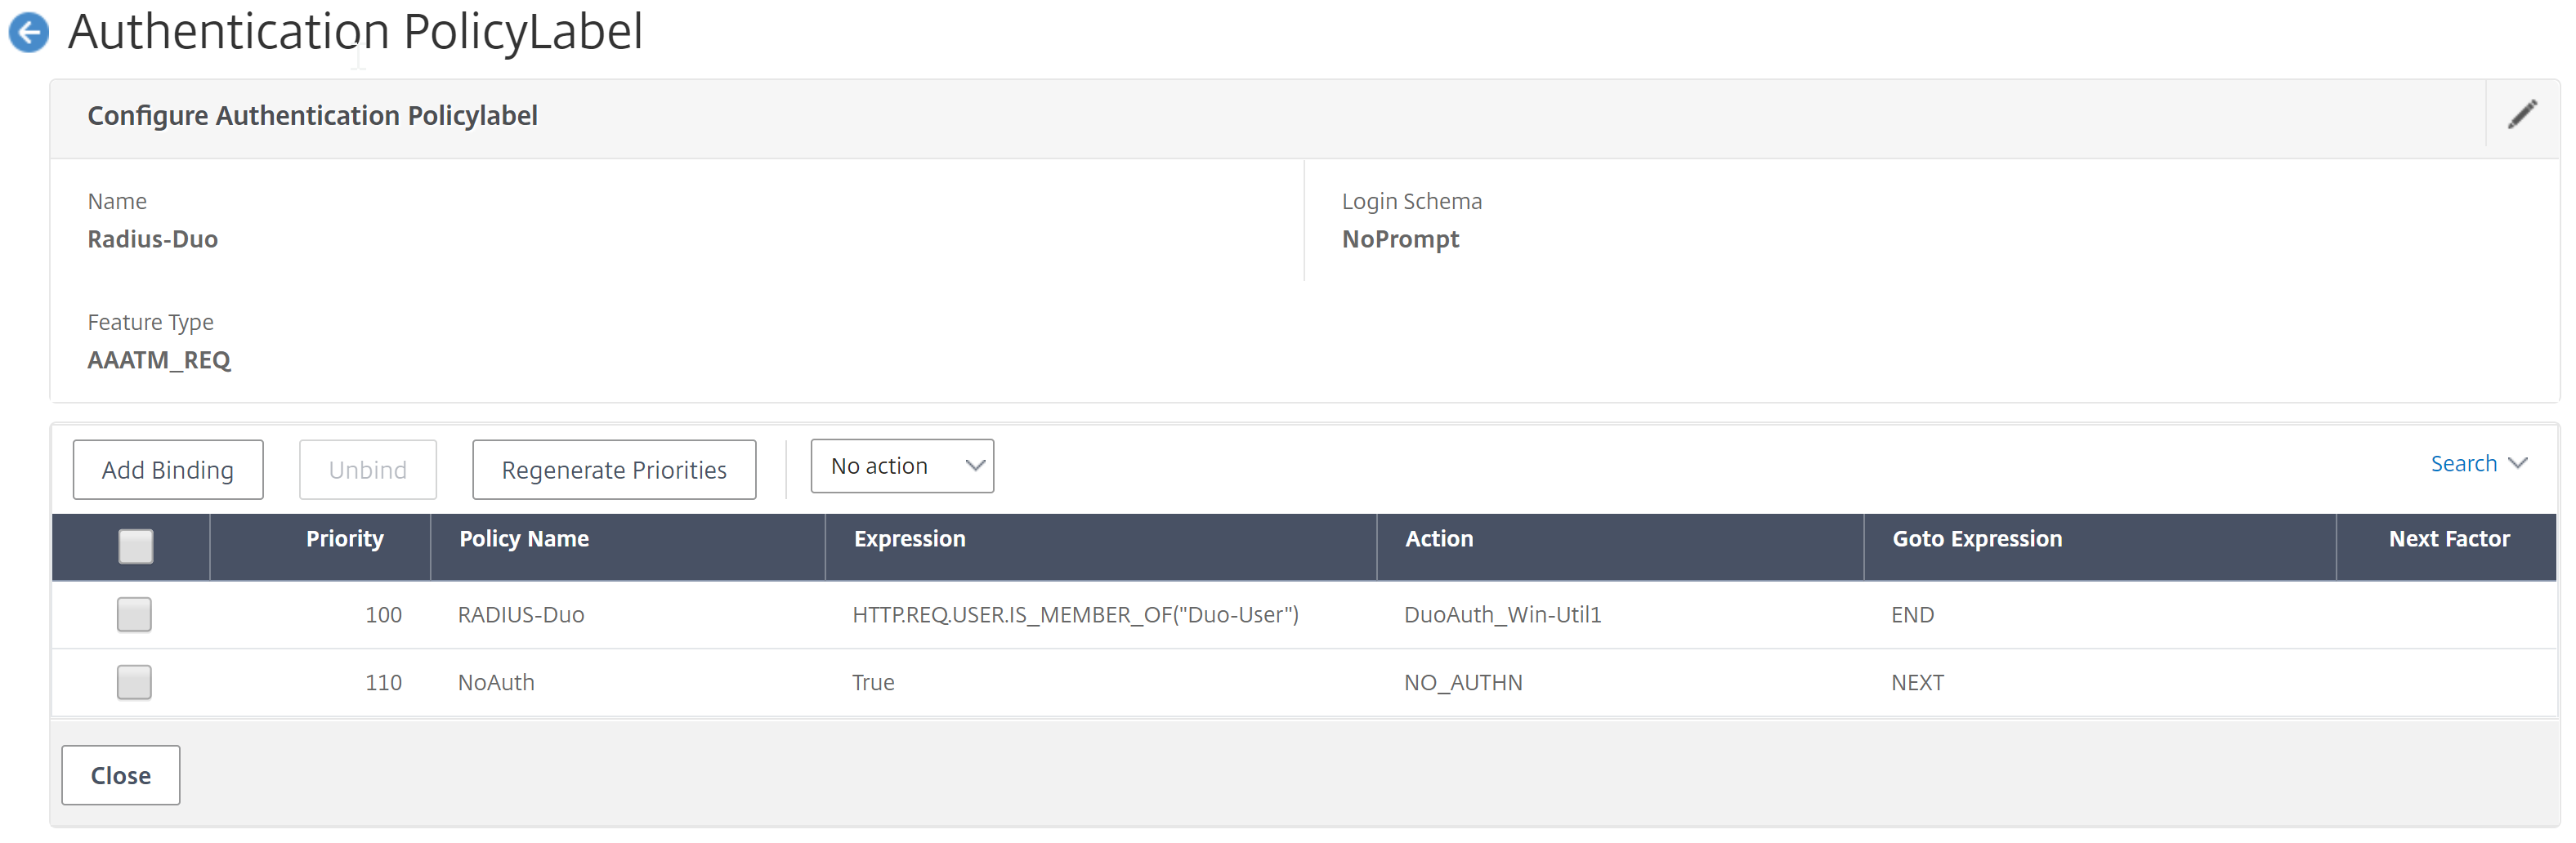
The first Policy Label will call for a push prompt from Duo with nothing displayed to the user. This will be used as a default when someone in the 2 factor AD group authenticates from a non-nFactor supporting client (Receiver or NetScaler client). Note, this step can be dropped once these clients support nFactor prompts. Navigate to Security > AAA – Application Traffic > Policies > Authentication > Advanced Policies > PolicyLabel. Click Add. Create the following policy:

Note the Action name in this screenshot differs from the settings below. Just a difference in my lab’s naming conventions.
- Name: Radius-Duo
- Login Schema: NoPrompt
- Feature Type: AAATM_REQ
- Click Create
- Policy Binding – Select Policy: Radius-Duo
- Goto Expression: End
- Select Next Factor: <None>
- Click Add Binding
- Select Policy: NoAuth
- Goto Expression: Next
- Next Factor: <None>
Next, we’ll create the Policy Label that will check the AD group and client type. Create the following policy:
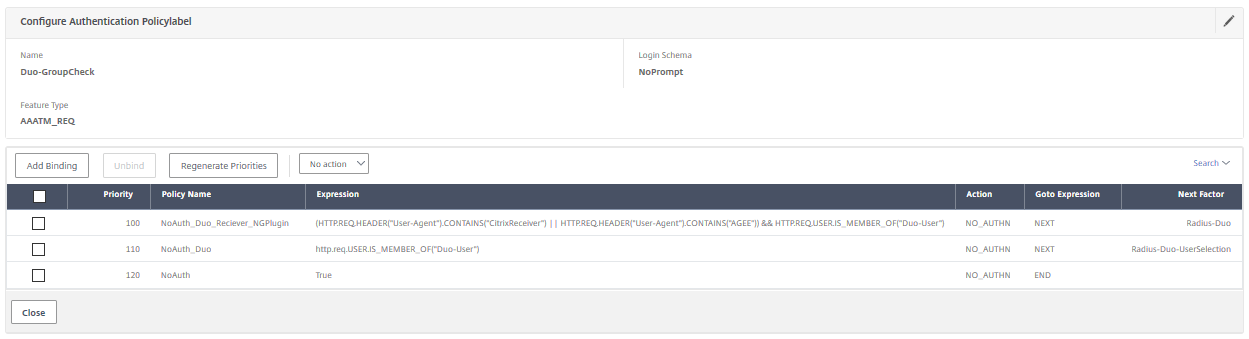
- Name: Duo-GroupCheck
- Login Schema: NoPrompt
- Feature Type: AAATM_REQ
- Click Create
- Policy Binding – Select Policy: NoAuth_Duo_Reciever_NGPlugin
- Goto Expression: Next
- Select Next Factor: Radius-Duo-Push
- Click Add Binding
- Select Policy: NoAuth_Duo
- Goto Expression: Next
- Next Factor: Radius-Duo-UserSelection
- Click Add Binding
- Select Policy: NoAuth
- Goto Expression: End
- Next Factor: <None>
Last, we’ll create the Policy Label that will ask the user what Duo factor to use. Create the following policy:
Note the Action names in this screenshot differ from the settings below. Just a difference in my lab’s naming conventions.
- Name: Radius-Duo-UserSelection
- Login Schema: Duo-Selector-Radio
- Feature Type: AAATM_REQ
- Click Create
- Policy Binding – Select Policy: Radius-Duo-Push
- Goto Expression: End
- Select Next Factor: <None>
- Click Add Binding
- Policy Binding – Select Policy: Radius-Duo-Phone
- Goto Expression: End
- Select Next Factor: <None>
- Click Add Binding
- Click Add Binding
- Policy Binding – Select Policy: Radius-Duo-Passcode
- Goto Expression: End
- Next Factor: <None>
AAA vServer
Now we’ll create the AAA vServer that will handle the authentication requests. In this case, we’re going to use a non-addressable (0.0.0.0) vServer. All requests to the vServer will go through the Unified Gateway DNS address.
Navigate to Security > AAA – Application Traffic > Virtual Server. Click Add and create the following:
- Name: nFactor-AAA
- IP Address Type: Non Addressable
- Click Create
- Click on “No Server Certificate” and bind your Unified Gateway certificate
- Click Continue twice (skip the auth policies for now)
Now we’ll bind the first Authentication factor to the AAA vServer. This will look a lot like creating a policy label. First, under Advanced Authentication Policies click on “No Authentication Policy” and create the following binding:

- Select Policy: LDAP-DomainName
- Goto Expression: Next
- Select Next Factor: Duo-GroupCheck
Next, bind the UsernamePassword Login Schema to the AAA vServer. On the right under Advanced Settings, click “+ Login Schemas” then scroll to the bottom of the page and click on “No Login Schema.” Create the following binding:

- Select Policy: UsernamePassword
Authentication Profile
We need to create a Authentication Profile for the new AAA vServer. Navigate to Security > AAA – Application Traffic > Authentication Profile and click Add. Create the following profile:
- Name: nFactor-AAA
- Authentication Host: <Unified Gateway vServer DNS Address>
- Choose Virtual Server Type: Authentication Virtual Server
- Authentication Virtual Server: nFactor-AAA
Unified Gateway Authentication Settings
The last thing we need to do is bind the AAA vServer to your Unified Gateway. Navigate to NetScaler Gateway > Virtual Servers and click on the Unified Gateway vServer. Remove any existing Basic Authentication policies or Authentication Profiles. Click the pencil icon on “Authentication Profile” and choose nFactor-AAA. Click OK and verify the profile is bound.

Other Notes
That’s it. Just one note:
- Keep in mind that if you’re using Unified Gateway to login to Storefront, you’ll need a Traffic Policy to keep Single Sign On working.
Hello there, just became aware of your blog through Google, and found that
it’s really informative. I’m gonna watch out for brussels.
I will be grateful if you continue this in future.
Numerous people will be benefited from your writing. Cheers!
My brother recommended I might like this web site. He was entirely right.
This post actually made my day. You cann’t imagine simply how much time I had spent for this
info! Thanks!
Hi, I am trying to implement the same with Duo. Below is my flow:
1. LDAP
2. Group check
3. Duo Radio button for MFA user group
When MFA user is redirected to radio button login schema, he gets “Try again or contact helpdesk”. aaad.debug shows – Received RAD_ACCESS_REJECT and Authentication failed for user from server X.X.X.X – Invalid Credentials
I tested individual Radius policies by binding them as basic policy to Gateway and it works. Issue is when I call them using nFactor through Radio button login schema.
Am I missing something?
I used a variation on this setup to just have the 2nd factor always be a duo push for our users.
it doesn’t provide any feedback for the users that the duo push is happening though.
any thoughts on how to provide a notification (eula type page) that will automatically trigger the duo push and then proceed without a clicking a button on that factor? i tried a login schema with no button and removed all the requirements besides text field and no luck. it seems like the bound policies dont get triggered till the form is submit and it can’t be done automatically. (maybe with some javascript but not native netscaler nfactor)
So I actually have a new post coming in the next couple days on exactly this. Unfortunately, the EULA method is the best that I’m aware of. It still requires a button press though. Most of the users I talked to actually like this though. It gives them a chance to get their phone out before the notification comes in. Reduces authentication timeouts from them fumbling with unlocking their device.
George, I have a new variation of this configuration based on some changes that Duo has made. Not sure if this resolves your issue, but it might work.
https://itrandomness.com/2019/09/netscaler-nfactor-with-duo-update/