
After years of using a Synology NAS, I have finally started to migrate my backup workflows to their native products (Hyper Backup and Active Backup) in my home environment. I quickly ran into a roadblock when I found that Hyper Backup doesn’t support Windows SMB file shares as a destination. Fortunately, it does support custom S3 servers. Using Minio, I was able to complete my backup workflow with the native Synology tools. This was a bit of an adventure, and I haven’t found any good guides on how to make it work. So here we go.
My long time backup setup has been based on a combination of Veeam Backup & Replication and Syncovery. Veeam handles backing up all of the virtual machines from my VMware vSphere environment. Syncovery is a swiss army knife of file copy. I use it to create a versioned copy the Veeam backups and NAS file shares to a local Windows server and to Backblaze B2.
Since Backblaze just announced S3 API support for the B2 platform, I figured it was a good time to give Synology’s native tools a try.
Overview
Before we get into the configuration, lets start with a little background on the different pieces:
- Synology Diskstation – I have a Synology DS1515+ as the main shared storage for my lab environment. It hosts NFS based datastores for vSphere as well as SMB file shares.
- Synology Active Backup for Business – ABB is Synology’s backup engine for creating backups of other systems on the NAS. It can backup physical desktops/servers (with an agent), file shares and VMware/Hyper-V based virtual machines. All ABB backups are stored on the NAS.
- Synology Hyper Backup – HB is Synology’s engine to create a backup copy of the NAS data in another location. It supports creating versioned copies of the NAS data (including ABB data) to a variety of destinations including: another Synology, S3 (AWS or other), Azure, Google Drive and Rsync servers. Unfortunately, it does not support SMB file shares.
- Minio – Minio is an open source S3 compatible storage server. It can be used to host S3 compliant object storage on just about any system. In my case, I’m going to use it to allow me to copy data from the NAS to my local file server with Hyper Backup.
Minio Overview
Minio is a single executable engine written in golang. Since it does not have a Windows installer, getting it running as a service takes a little bit of work. For the setup, there are two very important lessons I learned to make it compatible with Hyper Backup:
- Minio must be running with TLS enabled. Hyper Backup will only talk to S3 APIs over an encrypted connection.
- Minio must be running with virtual-host-style requests enabled. By default Minio handles only path-style requests. Hyper Backup only knows how to talk virtual-hosts-style requests.
Both of these options are easy to enable on Minio, but have prerequisites that need to be met. We’ll dive into those below.
Minio Certificate
To run Minio in TLS mode, we need to generate a certificate for it. Fortunately, Hyper Backup will work with a self signed certificate. Use the instructions here to generate a self signed certificate with your preferred method. Once you have the certificate files, save them on the window server as public.crt and private.key (these must be the exact file names). Make sure they’re in the location where you intend to use them.
Minio Installation
There is no Windows installer for Minio. To install, simply download the server executable from the web site. Put the executable in a location where you want it to run (in my case H:\Minio).
Next we, need to setup Minio to run as a Windows service. Minio has published excellent instructions for that step. Since we have a number of advanced features we need to enable, I’m using the Manual Install portion of those instructions.
First download WinSW.NET4.exe to your Minio directory (H:\Minio for me) and rename it to minio-service.exe. Then create minio-service.xml and add the following:
<service>
  <id>MinIO</id>
  <name>MinIO</name>
  <description>MinIO is a high performance object storage server</description>
  <executable>minio.exe</executable>
  <env name="MINIO_ACCESS_KEY" value="<access_key_string>"/>
  <env name="MINIO_SECRET_KEY" value="<secret_key_string>"/>
  <env name="MINIO_DOMAIN" value="<DNS_name_of_server>"/>
  <arguments>server --address ":443" -S <path_to_SSL_certificate_files> <path_to_storage></arguments>
  <logmode>rotate</logmode>
</service>
Replace the following variables:
- <access_key_string> – The access key you would like to use. This will be used both for Hyper Backup and access to the Minio web console.
- <secret_key_string> – The secret key you would like to use. This will be used both for Hyper Backup and access to the Minio web console.
- <DNS_name_of_server> – The DNS address of the Minio server. This MUST be the DNS address that will be entered into Hyper Backup as the server address.
- <path_to_SSL_certificate_files> – File path where you stored the self signed certificate files (H:\Minio)
- <path_to_storage> – File path where the S3 data will be stored (H:\Minio-data)
Next run the following from an administrator command prompt:
minio-service.exe install
net start minio
Check to see if the minio service is running. You should now be able to access the Minio console at https://<DNS_name_of_server>. Your access and secret keys are the logon credentials.
Minio DNS Setup
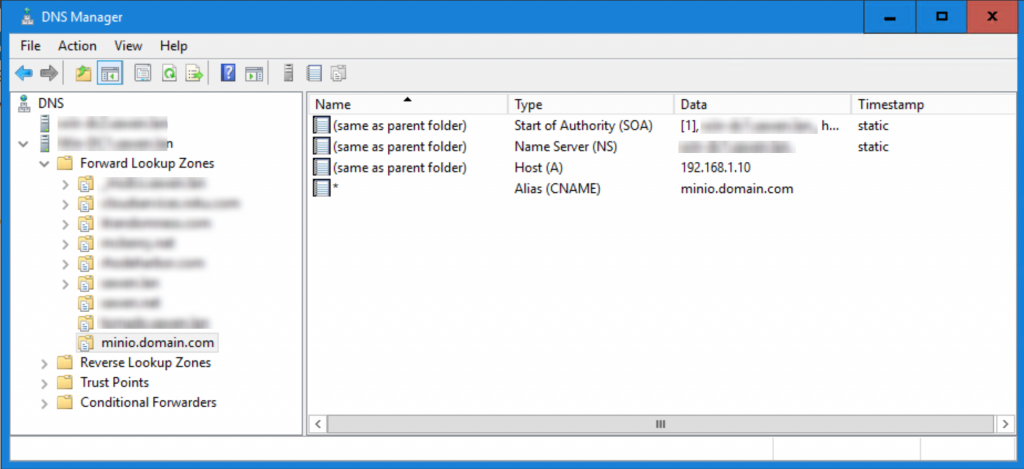
To use virtual-hosts-style requests, we need to setup DNS to accommodate it. Virtual-hosts-style requests means that the client will attempt to access the S3 server with the DNS address of <bucket_name>.<DNS_name_of_server>. So, for a bucket called MyBucket on a server with the DNS address of minio.domain.com, Hyper Backup will look for the DNS address: MyBucket.minio.domain.com.
For this to work, your DNS server will need to resolve MyBucket.minio.domain.com. In my case, I use Windows DNS. So I created a new Zone for my server’s DNS address and created a wild card CNAME. This allows *.minio.domain.com to resolve to the server. Here’s what that looks like for a server with the DNS address of minio.domain.com:
Hyper Backup Setup
That’s the hard part. Now we can setup Hyper Backup the same way we would for AWS S3:
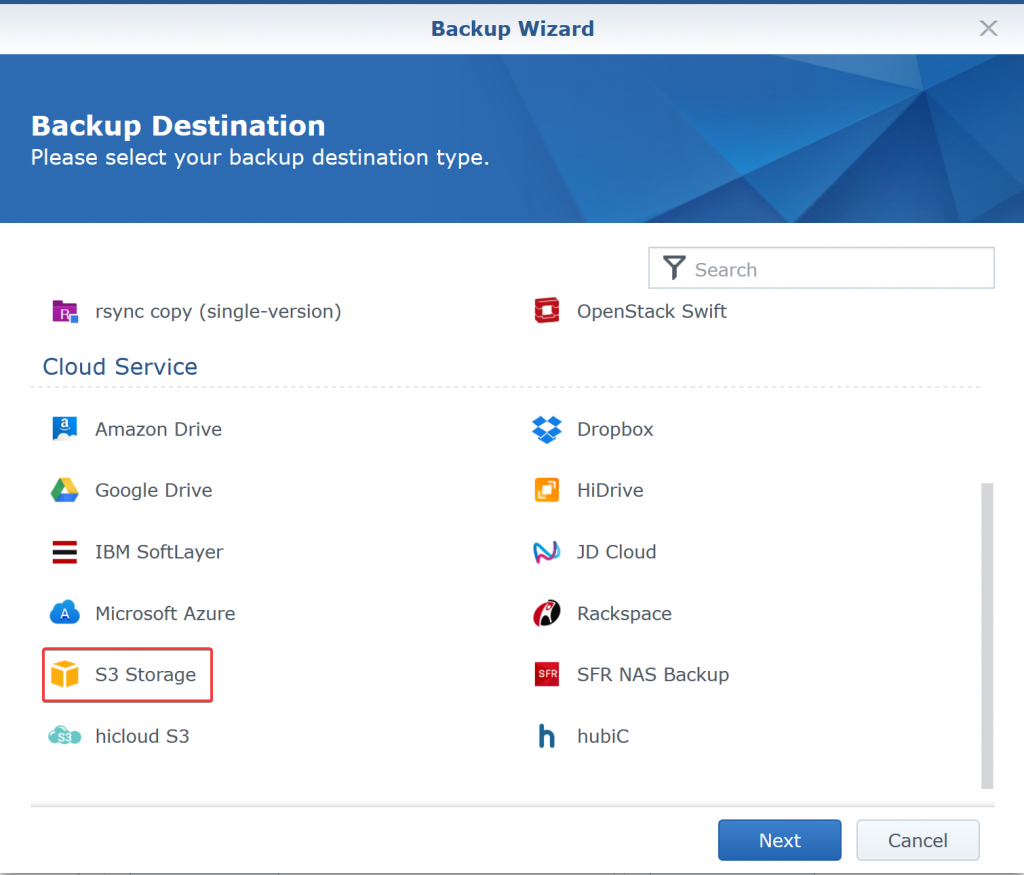
Open Hyper Backup and click the + icon in the lower left. Select “Data backup task”. Choose S3 Storage as the Destination type and click Next.
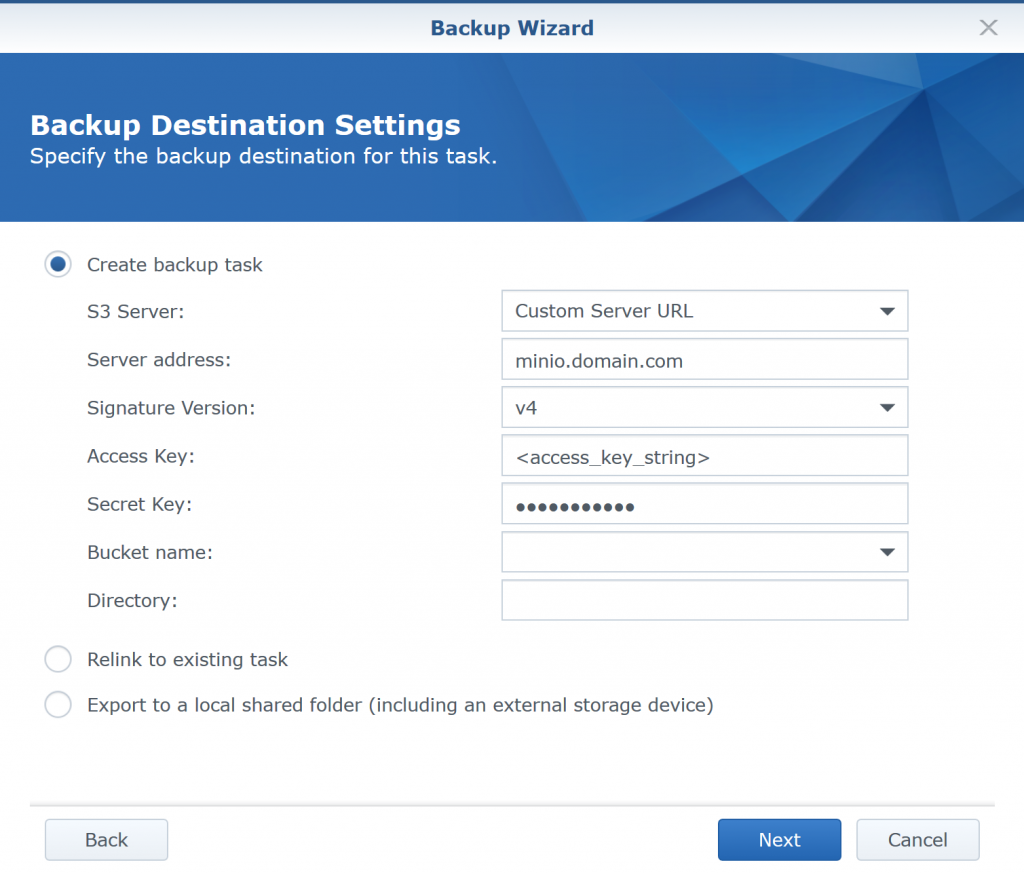
On the next screen, select “Create backup task”. Choose Custom Server URL for the S3 Server. Enter your Minio server DNS address. Choose Signature Version V4. Enter your access and secret keys from the Minio service setup. You can now either select an existing bucket from the Bucket Name drop down or select to create a new one. Then enter the name of the directory you want Hyper Backup to use inside the bucket. Click Next.
On the remaining screens configure the Synology folders to backup, schedule and retention settings.
Leave a comment